在阅读本文之前,假设已经在 GCP 上安装好了 Kubeflow。
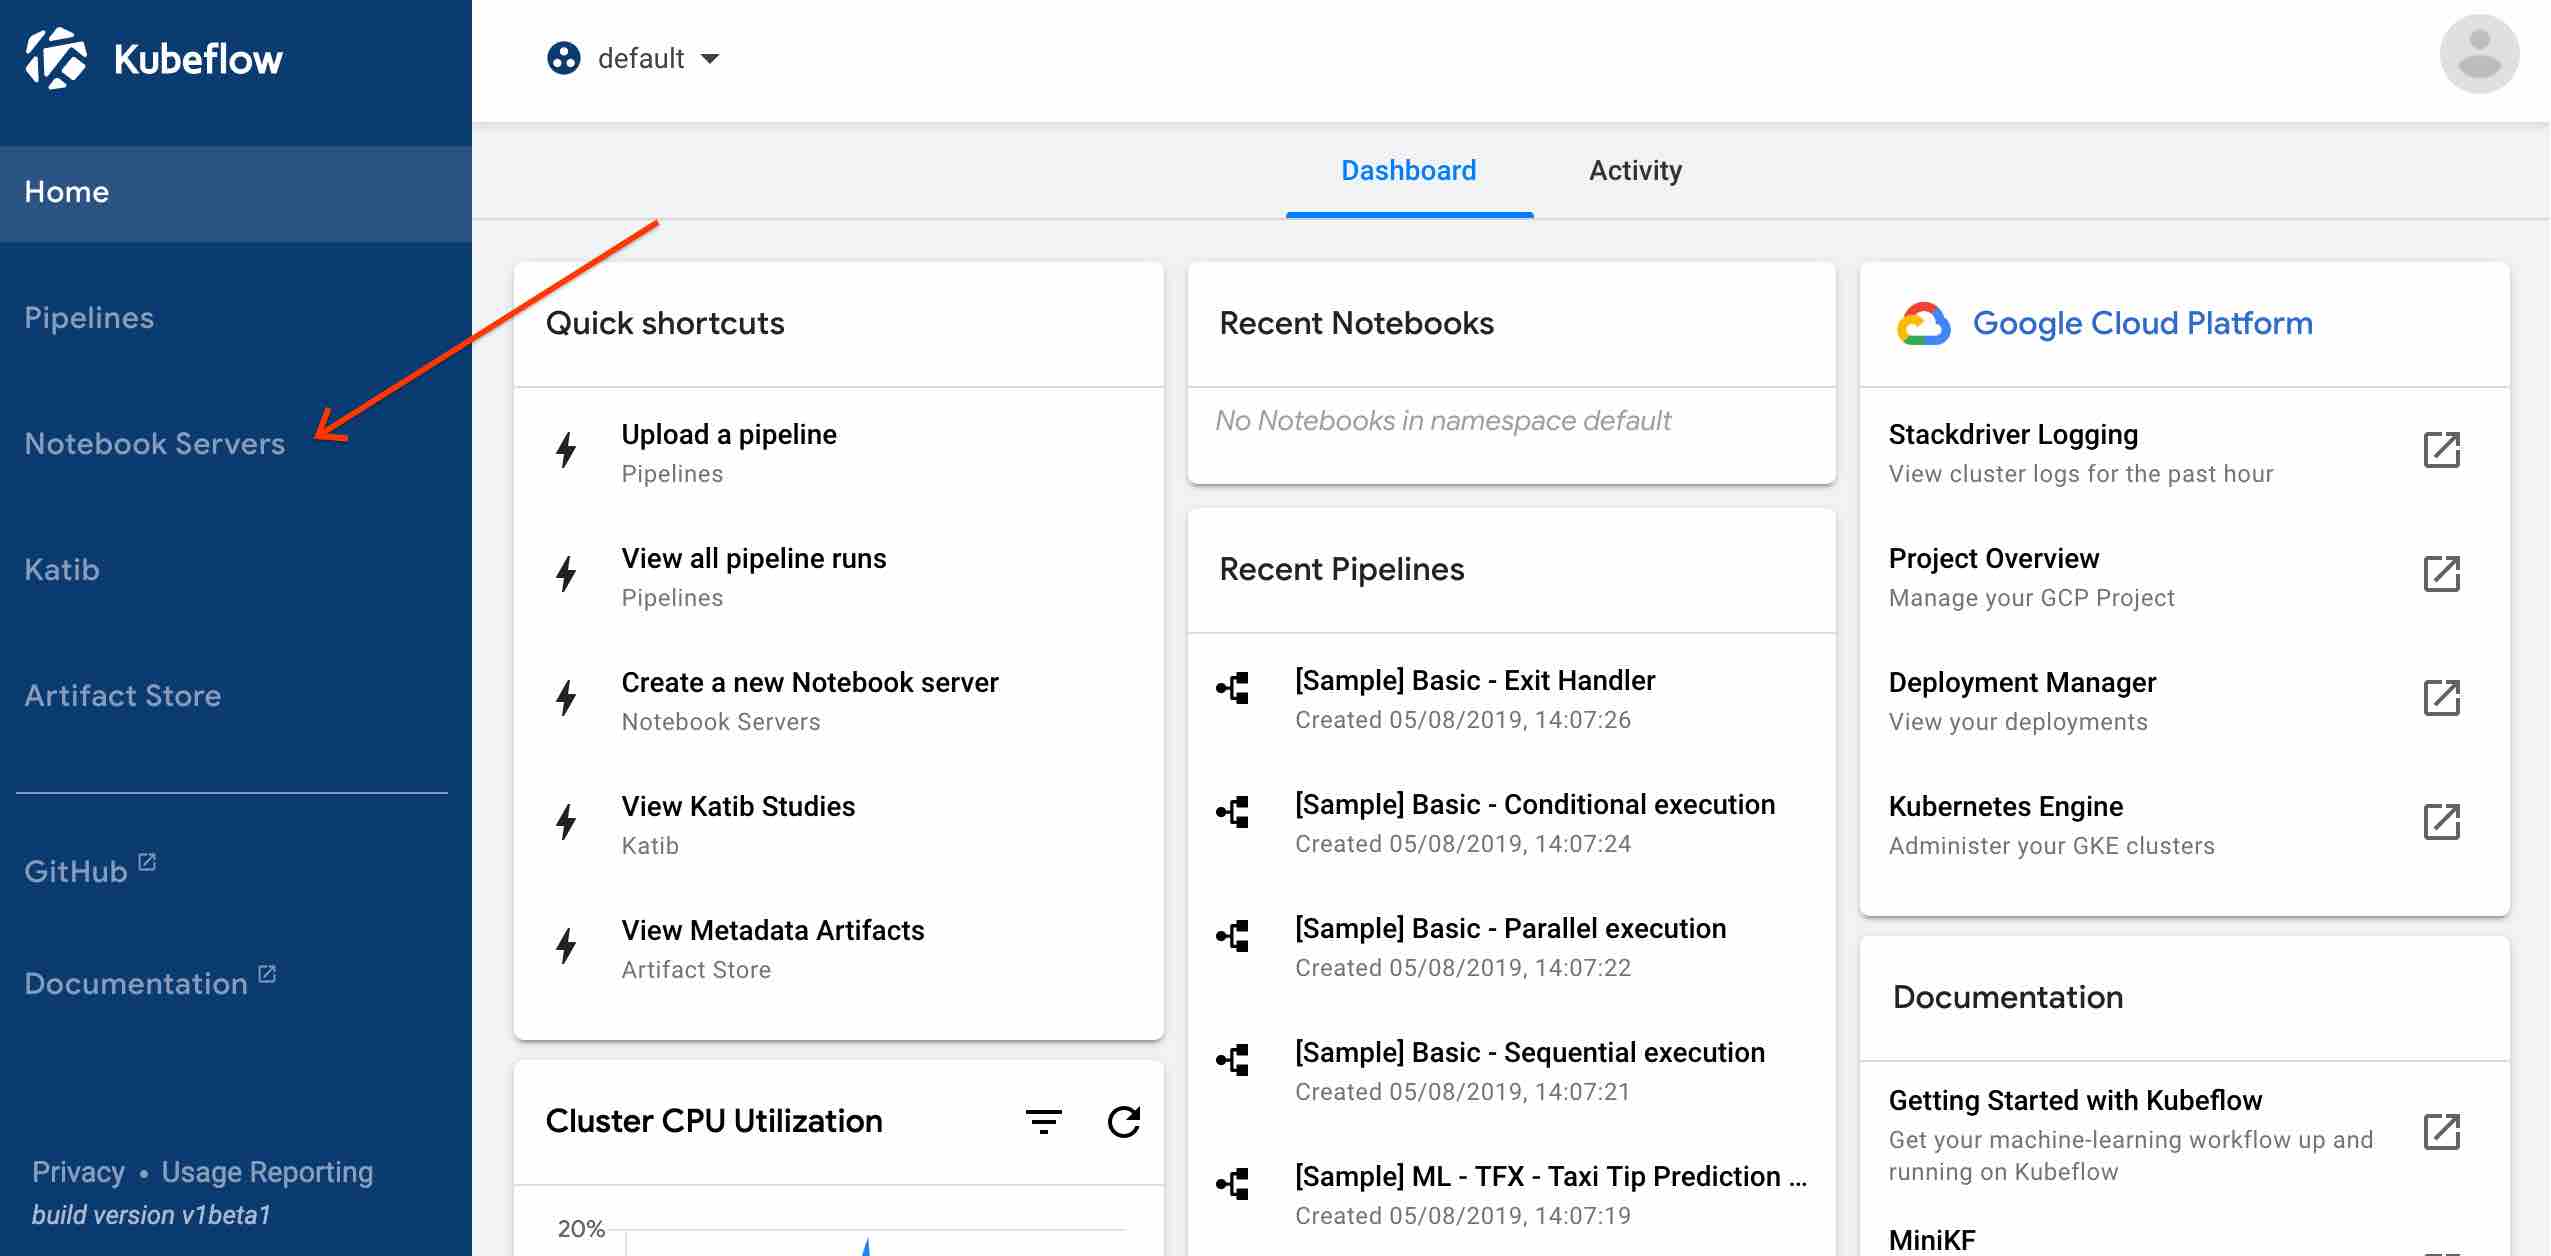
首先进入 Kubeflow,点击 Notebook Server,新建一个 Jupyter Notebook。
新建的时候会让你输入 Name 和 Namespace,在 Kubeflow 中,每个用户都在 k8s 集群上有自己的 Namespace。
这里输入的 Name 对应的 Notebook Pod 最后会在自己的 Namespace 下。
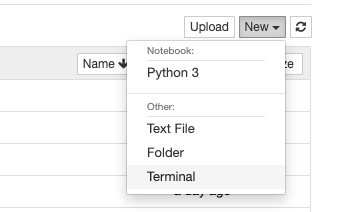
新的 Notebook 里面是空的,我们需要下载一些例子。打开 terminal
然后输入 git clone 命令:
git clone https://github.com/kubeflow/examples.git
回到默认界面会看到刚刚 clone 的项目,打开 mnist 目录下的 mnist_gcp.ipynb
开始
首先第一个问题,当我打开这个 Jupyter Notebook 的 WebUI 时,它运行在哪里?
Notebook 是在哪个 Pod
$ kubectl -n Your-namespace get pod

NAME                                 READY   STATUS      RESTARTS   AGE
fairing-builder-chvkq-6s4cn          0/1     Completed   0          3d23h
mnist-model-7886dcbb5b-t2kk8         1/1     Running     0          3d22h
mnist-tensorboard-774c585b7c-65766   2/2     Running     0          21h
mnist-train-2596-chief-0             0/1     Completed   0          3d22h
mnist-train-2596-worker-0            0/1     Completed   0          3d22h
mnist-ui-7f95c8498b-xqsfs            2/2     Running     0          3d22h
test1-0                              2/2     Running     0          3d23h
test1-0 是之前在 UI里面创建 Notebook server 时定下的名字,于是test1-0
这个 Pod 的镜像其实是 TensorFlow 的基础上,为 Kubeflow 做了稍微一些定制。
进入到这个 Pod 里面之后用 ps 命令看一下
________                               _______________
___  __/__________________________________  ____/__  /________      __
__  /  _  _ \_  __ \_  ___/  __ \_  ___/_  /_   __  /_  __ \_ | /| / /
_  /   /  __/  / / /(__  )/ /_/ /  /   _  __/   _  / / /_/ /_ |/ |/ /
/_/    \___//_/ /_//____/ \____//_/    /_/      /_/  \____/____/|__/


You are running this container as user with ID 1000 and group 100,
which should map to the ID and group for your user on the Docker host. Great!

tf-docker ~ > ps aux
USER         PID %CPU %MEM    VSZ   RSS TTY      STAT START   TIME COMMAND
jovyan         1  0.0  0.0   4520   764 ?        Ss   Mar18   0:07 tini -- sh -c jupyter notebook --notebook-dir=/home/${NB_USER} --ip=0.0.0.0 --no-browser
jovyan         7  0.0  0.0   4628   788 ?        S    Mar18   0:00 sh -c jupyter notebook --notebook-dir=/home/${NB_USER} --ip=0.0.0.0 --no-browser --allow-
jovyan         8  0.0  0.2 801768 67724 ?        Sl   Mar18   0:55 /usr/bin/python3 /usr/local/bin/jupyter-notebook --notebook-dir=/home/jovyan --ip=0.0.0.0
jovyan        61  0.0  0.0   4628  1680 pts/0    Ss+  Mar18   0:00 /bin/sh -l
jovyan        76  0.0  0.4 1875928 139504 ?      Ssl  Mar18   5:35 /usr/bin/python3 -m ipykernel_launcher -f /home/jovyan/.local/share/jupyter/runtime/kerne
jovyan       545  0.0  0.0  20180  3856 pts/1    Ss+  02:04   0:00 bash
第一行的 TensorFlow logo 说明了这个image 是基于 TensorFlow 的。
其中 /usr/bin/python3 -m ipykernel_launcher 这个进程对应 WebUI 里面的 notebook,每当你打开一个新的 Notebook 写代码时,Pod 里面就会多出一个进程。
其中,ipykernel 是一个交互式 python 模块。
Step-by-Step
一开始是执行一些 import 操作。
from importlib import reload
from oauth2client.client import GoogleCredentials
credentials = GoogleCredentials.get_application_default()

import notebook_setup
reload(notebook_setup)
notebook_setup.notebook_setup()
这些 import 的模块应该都是定制 TensorFlow image 中预先配置好的。如果想知道源码具体位置,可以
import name
printf(name.__file__)
notebook_setup.py 模块是在 example/mnist 目录下。
在 notebook_setup.py 中
setup_gcp():中可以直接调用 gcloud 命令,并且已经配置好可以直接访问当前 project,猜测是因为 GCP 定制的 kubeflow image 预先设置好了 ?
from kubernetes import client as k8s_client
from kubernetes.client import rest as k8s_rest
from kubeflow import fairing
from kubeflow.fairing import utils as fairing_utils
from kubeflow.fairing.builders import append
from kubeflow.fairing.deployers import job
from kubeflow.fairing.preprocessors import base as base_preprocessor

# Setting up Google Container Registry (GCR) for storing output containers.
# You can use any Docker container registry instead of GCR.
GCP_PROJECT = fairing.cloud.gcp.guess_project_name()
DOCKER_REGISTRY = 'gcr.io/{}/fairing-job'.format(GCP_PROJECT)
namespace = fairing_utils.get_current_k8s_namespace()
再 import kubeflow 的一些模块,其中比较有意思的是 kubeflow.fairing。 导入这个模块后,可以很方便的获取 GCP 的配置,比如 project name, namespace 等。
Use Kubeflow Fairing to build the Docker
这里有意思的是用 kaniko-project 在 GKE 上 build image。
有意思在什么地方呢? 我们知道 GKE 上的运行单位是 Pod,Pod 本身就是容器的集合,一般我们都是在本地制作好 image 后 push 到 gcr 上,而这个项目是在 Pod 里面 build image 后直接 push 到 gcr。
具体参考 kaniko项目
这一步是 build 什么 docker image 呢 ?
在 example mnist 目录下,有一个 Dockerfile.model
> cat Dockerfile.model
#This container contains your model and any helper scripts specific to your model.
# When building the image inside mnist.ipynb the base docker image will be overwritten
FROM tensorflow/tensorflow:1.15.2-py3

ADD model.py /opt/model.py
RUN chmod +x /opt/model.py

ENTRYPOINT ["/usr/local/bin/python"]
CMD ["/opt/model.py"]
看来这个 image 是用来训练模型的。
最后生成的 image 被push 到了 gcr.io 上。
Built image gcr.io/project-name/fairing-job/mnist:85809C08
Create a Cloud Storage bucket
这一步没什么好说的,就是 google cloud 的 api 调用。
from google.cloud import storage
bucket = f"{GCP_PROJECT}-mnist"

client = storage.Client()
b = storage.Bucket(client=client, name=bucket)
Distributed training
这一步就是启动一个 Pod,它的 deployment 类型是 TensorFlow 定制的 TFJob, 所用的 image 和保存数据的 bucket 都是前两步准备好的。
train_name = f"mnist-train-{uuid.uuid4().hex[:4]}"
num_ps = 1
num_workers = 2
model_dir = f"gs://{bucket}/mnist"
export_path = f"gs://{bucket}/mnist/export"
train_steps = 200
batch_size = 100
learning_rate = .01
image = cluster_builder.image_tag
训练的数据从哪来
那么 model.py 训练的数据从哪来呢? 在 example 目录似乎并没有看到。这要从 mnist 说起,MNIST 是 Modified National Institute of Standards and Technology 的缩写,这是一个手写数字的数据库。
因此,model.py 中导入的库已经会自动下载训练数据。
然后,调用 kubeflow.tfjob.api 提供的函数 apply 这些配置。其作用等效于 kubectl apply, 但是因为 yaml 中有变量,所以只能用函数的方式。
from kubeflow.tfjob.api import tf_job_client as tf_job_client_module

tf_job_client = tf_job_client_module.TFJobClient()

tf_job_body = yaml.safe_load(train_spec)
tf_job = tf_job_client.create(tf_job_body, namespace=namespace)
logging.info(f"Created job {namespace}.{train_name}")
另一个 apply 的函数是 k8s_util.apply_k8s_specs,在下文会遇到。
为什么叫 Distributed training 呢? 因为 TFJob yaml file 里有三个角色:PS,Chief,Worker。
Deploy TensorBoard
TensorBoard 是一个调参的 WebUI,不是本文的重点,先跳过。
Serve the model
Serving 一个模型用的是 TensorFlow 提供的 tensorflow/serving:1.15.0 镜像,TensorFlow serving 是一个用 C++ 编写的 serving 程序。
从给出的 YAML file 能看出,传入的参数包括了前面训练后生成的模型,它保存在 model_base_path = export_path 中,而export_path 在训练模型那一步已经指定。
其实说到底,最后用户是与 serving 打交道,因此这个 Pod 需要一个对应的 k8s Service 类型,YAML file 中指定了 9000 和 8500 端口,前者给 grpc 调用,后者是 http 接口。
Deploy the UI for the MNIST web
前面已经把训练模型、开启serving 都做好了,最后一步,是给一个用户界面让用户使用,因此这个 UI 是一个单独的组件。
从源码的 web-ui 目录中可以看出,是用 python flask 框架提供简单的 http server 服务,以及一个 Dockerfile。
其中最重要的是 mnist_client.py 文件中的 get_prediction() 函数,由它调用后端的 Model Serving 服务。
UI 和 Pod 内通信
那么 UI 是怎么与 Model Serving 通信的呢? 最主要的是调用 grpc 和 tensorflow_serving 的 python API。 至于 grpc,前面在部署 TensorFlow serving 的时候 service 文件提供了 grpc 和 http 端口。
from grpc.beta import implementations
import tensorflow as tf
from tensorflow_serving.apis import predict_pb2
from tensorflow_serving.apis import prediction_service_pb2

def get_prediction(image, server_host='mnist-service', server_port=9000,
                   server_name="mnist", timeout=10.0):
  """
  Retrieve a prediction from a TensorFlow model server

  :param image:       a MNIST image represented as a 1x784 array
  :param server_host: the address of the TensorFlow server
  :param server_port: the port used by the server
  :param server_name: the name of the server
  :param timeout:     the amount of time to wait for a prediction to complete
  :return 0:          the integer predicted in the MNIST image
  :return 1:          the confidence scores for all classes
  :return 2:          the version number of the model handling the request
  """
  print("connecting to:%s:%i" % (server_host, server_port))
  # initialize to server connection
  channel = implementations.insecure_channel(server_host, server_port)
  stub = prediction_service_pb2.beta_create_PredictionService_stub(channel)

  # build request
  request = predict_pb2.PredictRequest()
  request.model_spec.name = server_name
  request.model_spec.signature_name = 'serving_default'
  request.inputs['x'].CopyFrom(
      tf.contrib.util.make_tensor_proto(image, shape=image.shape))

  # retrieve results
  result = stub.Predict(request, timeout)
  resultVal = result.outputs["classes"].int_val[0]
  scores = result.outputs['predictions'].float_val
  version = result.outputs["classes"].int_val[0]
  return resultVal, scores, version
结束语
- 需要熟悉一堆第三方库怎么用。比如
- 操作 GCP的 oauth2client.client
- k8s_util
- kubeflow,kubeflow.fairing.preprocessors
- kubernetes
- google.cloud
- 几个有意思的开源项目,比如 kubeflow fairing,在 GKE 里面 build image 的 kaniko 等。